Clonezilla Server
Two kinds of Clonezilla server are available, one is Clonezilla lite server, and the other is Clonezilla server edition.
-
Clonezilla Lite Server
From Clonezilla live >= 2.5.2-17, there is a lite server mode which you can use to deploy the clients. What you need is to boot a machine with Clonezilla live and run it as the Clonezilla lite server, then you can use it for massive deployment. For more info, please refer to this step-by-step docs. -
Clonezilla Server Edition
How to setup a Clonezilla server ?
A DRBL server must first be prepared in order to use Clonezilla to do massively cloning. There are 2 ways you can do, i.e.- Use DRBL Live without installation it on a server To put DRBL live on boot media (CD or USB flash drive), the basic steps are to download pre-build DRBL Live then put it in a boot media (CD, USB flash drive or USB hard drive). Two types of files are available, iso and zip. The former one is for CD, the latter is for USB flash drive.
- For CD/DVD:
- For USB flash drive or USB hard drive:
- The 2nd method is to install and configure DRBL on GNU/Linux system. To install and configure a DRBL server, check this installation doc then follow it to setup such a Clonezilla server. The setup might take about 30 minutes to a few hours, it depends on your internet bandwidth. Once DRBL is installed on the server, Clonezilla is ready. During the configuration, you can choose to use the OS on the server as client's working environment when doing Clonezilla imaging/cloning job, or to use Clonezilla live as the OS of client in Clonezilla SE. For how to use the latter mode, you can refer to here.
Download an ISO file for CD/DVD. Then you can burn the iso file to a CD/DVD with any burnning program, such K3b on GNU/Linux or InfraRecorder on MS Windows, and remeber to choose "Burn Image" to burn the ISO file on the CD. The CD can then be used to boot the machine you want to image or clone.
To put DRBL live on a USB flash drive or USB hard drive, check this doc.
When setting up the DRBL server, it is recommended to collect the MAC addresses of the client computers and let the DRBL server offer the same IP address for the clients every time it boots. If you prefer to use DRBL live, remember to isolate the network environment from others. This will keep you from cloning the system to incorrect or unknown clients. Besides, if you do not provide the static IP address to client, different operating systems (like GNU/Linux and MS windows), they use different DHCP client ID. Therefore even it's the same client, when it boots GNU/Linux via DRBL, it will leases one IP address, then next time when it boots into local MS windows, it will lease another different IP address. This is annoying sometimes. However, if you are 100% certain that no other computer will be involved in the DRBL environment, and you do not care about the different IP address leasing problem, you can use the range in dhcpd.conf. In this case, you can even use the "impatient method" to setup the DRBL environment.
How to use Clonezilla server edition ?
- As root, run "dcs" in DRBL server to switch clients' mode. You will see two menus: clonezilla-start and clonezilla-stop like this:

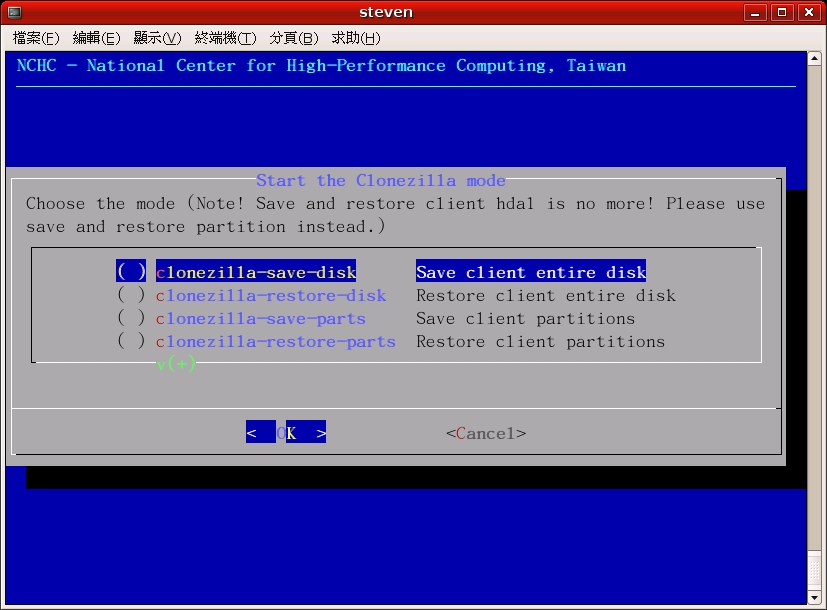
Check clonezilla-start by "space" key, various modes will be shown:
Again, check the mode you want by "space" key, then follow the menus to do it. Once the mode in DRBL server is ready, you can boot your clients via PXE to save or restore the image.
- Examples:
- The following is an example of how to save an image from a single computer (called computer M) and then restore it to 39 computers in a 40-computer classroom:
- Set the Clonezilla server to be clonezilla-save-disk mode: In the Clonezilla server,
- run "dcs", then choose "clonezilla-start" (use the space key to mark it). Next, choose"clonezilla-save-disk" (use space key to mark it)
- Turn on computer M, set it as network boot (PXE or etherboot) in the BIOS or by pressing the hotkey (refer to your motherboard manual) when it is booting.
- When computer M finishes the network boot, if you do not enter image and device name when running "dcs" -> clonezilla-start -> clonezilla-save-disk, a prompt will ask you to name the image and choose the device. Now enter the name (e.g. nomorems) and then choose the disk you want to save it to. Otherwise, it will use the image and device name you already inputted in the clonezilla server to save the image.
- Once the image is saved, set the mode to be clonezilla-restore-disk in the Clonezilla server. As an example, in the Clonezilla server,
- run "dcs". Next, choose "clonezilla-start" (use space key to mark it). Next, choose "clonezilla-restore-disk" (use space key to mark it).
- The program will ask you which source image to restore. In this example, we chose the image "nomorems."
- Set the Clonezilla server to be clonezilla-save-disk mode: In the Clonezilla server,
- Make sure the clients (i.e. the computers to be cloned) will boot from the network (PXE or etherboot) then turn on the clients to let them boot from network.
- The clients will begin to clone the system image "nomorems" to their harddisks.
- Once all clients finish cloning, you can stop clonezilla by dcs -> clonezilla-stop.
- More examples are available here.
To stop clonezilla:
As root, run "dcs", then choose "Clonezilla-stop". Or you can use "drbl-ocs stop".
PS: You can refer to DRBl-winroll to make the restored (cloned) MS Windows with a different hostname automatically.


